Lights in the Attic
One of my favorite books as a teen was a book of Shel Silverstein's poetry called A Light in the Attic. In fact, with all the books that I've gotten rid of, this one remains.
There are so many poems in it that I really enjoy - why I kept the book, of course. Here's one that I've been thinking about recently.

Signals, from A Light in the Attic, poem and drawing by Shel Silverstein
Sometimes things come easily to us - the light is red or green. Other times things seem out of our reach - "the light turns blue with orange and lavender spots" - and we just don't know what to do. But you may be feeling that this project is more like the blue light with orange and lavender spots than a red or green light. Let me walk you though an attic project here and give you a little more direction.
NOW is a great time to tackle the attic. Or garage. Or basement. Or wherever it is that you store your holiday decorations. Get it, "lights" in the attic! Since you are decorating now anyway, go ahead and get it allllllll out of the attic (we'll stick with "attic" for simplicity's sake in this article). Before you get it all out, set aside some time, find a friend or family member, and clear some good working space.

1. Select the space you are going to work in. For this article, we're choosing attic, holiday decor.
BONUS TIP: Take a before photo. Trust me, you'll be encouraged when you look at the before and after side-by-side.

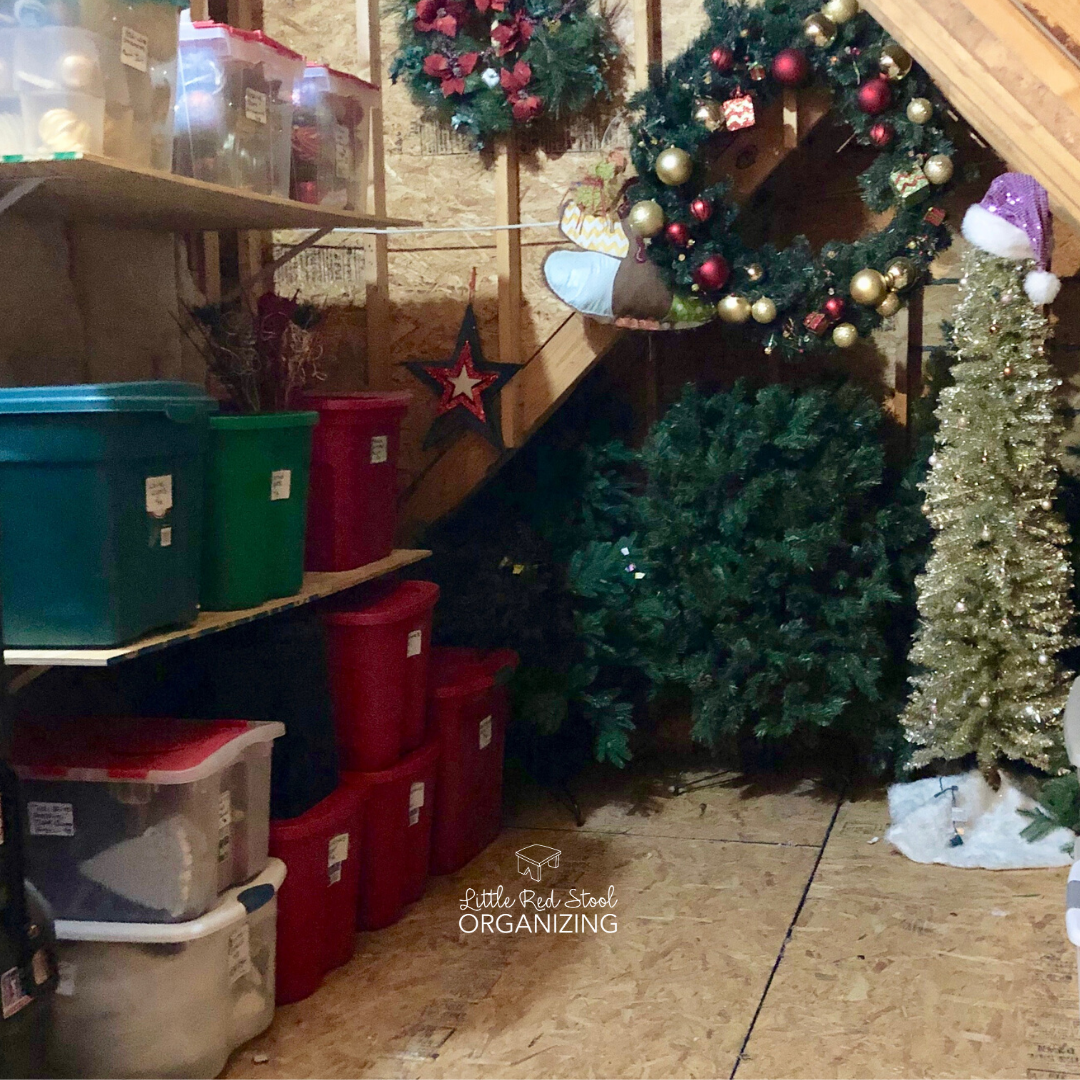
2. Empty the space you selected. Here we left the Christmas trees and wreaths. We did go through each item to make sure they were staying.
BONUS TIP: Tap a nail into the wall to hang wreaths. This makes the best use of the vertical space while also preserving the shape of the wreaths and signs.

3. All of the things that you took out has to have a place to go. We were sure to clear this room to make space for everything.
BONUS TIP: A table can be helpful to stay on task. Go through only the things on the table. As they have been decided on they will go into "keep", "trash", or "donate" piles and off of the table. Pull the next box up to the table and continue the process.

4. As you empty boxes, set them aside for future use. You may bring them in as needed to hold donations or as a temporary holding place for decorations you are keeping.
BONUS TIP: Now is the time of year that you can buy ornament storage kits in store. If you are reading this article in an off season, you can make your own ornament storage with cardboard and scissors.

5. When you know exactly what you have that you are keeping, put them all together, like with like if you haven't already. Then find the appropriate bin and add a label. For example, lights with lights, balls with balls, garland with garland.
BONUS TIP: If you have different rooms or trees, store those items together. For example, all the den items together and all the porch items in another bin, each labeled appropriately.

6. Put all the decorations back, like with like. We found Fall decorations that are in here too.
BONUS TIP: Put the holidays in chronological order to make them easier to find.
As usual, be sure that everything that didn't go back to the attic goes to its new home. The trash in the trash can and donations in the car and to the donation location.
Thanks for coming along for that attic project! It's always so much fun to work with clients and see their progress. If you are overwhelmed with the thought of doing such a large space, get in touch and we'll get you on the calendar.
Happy decluttering and decorating!